Early Adventures in 3D Printing

New technology excites me. Always. In my experience, learning and understanding new technology can only ever have positive results. It is never a hindrance to education or career (unless you make it so by misapplying what you've learned or prematurely forcing new technologies where they're not helpful, so don't do that).
I've been following the 3D Printing phenomenon for years. I continue to marvel at the number of applications people find for it. So why not give it a try, even if I can think of no personal use case for it today?
That was my thinking a month ago. Then I thought of a use case, which shall remain secret. But there's a difference between deciding to learn and actually learning. Thankfully, I watched this YouTube video before I began, and it taught me an important lesson: "Treat it like a hobby." Understand that you have a lot to learn. Experiment. Be patient. Don't expect everything to just work. Invaluable advice.
Here's a video I slapped together of the whole adventure:
Disclaimer before moving on: I AM NOT AN EXPERT. My 3D Printing life is in its infancy. I will probably say naive and stupid and incorrect things in this post, but I'm trying. Lots more to learn. Please comment if you can help me along.
Selecting a 3D Printer
Buying a printer is the first and most challenging part of the process. There are dozens (or perhaps hundreds) of printers from which to choose. I won't go into all the details, but the first decision is FDM or SLA.
You can find more thorough and scientific explanations, but basically this means a filament based printer (FDM, Fused Deposition Modeling) or a resin based printer (SLA, Stereolithography apparatus). One melts spools of hardened filament to print successive layers on top of each other, while the other uses a liquid resin that must be cured with various types of light.
My research indicated that Resin produces higher quality details, especially at smaller sizes. My planned use case doesn't require such high detail at small sizes. Coupled with resin's more complicated finishing process and somewhat more dangerous chemicals, filament seemed the right option for me. (Note, this is about as simplistic as one can get discussing the major differences between them, but this post isn't about detail so much as experience).
Once that major decision is behind you, the next is all about price and features. As price increases, you'll find printers that perform more tasks automatically (like bed leveling), dual extruders for printing with multiple filament types simultaneously, full enclosures for heat stability, and amenities like built-in cameras and the ability to monitor print jobs via the internet. Some printers come fully assembled. Others arrive as a kit to assemble yourself. I didn't want to build a kit. I'm more interested in the printed results than the mechanics of the printer. So I narrowed my options to printers that were the most user friendly and simplified the process as much as possible.
I read hundreds of reviews, watched dozens of YouTube videos. The 3D printing community seems eager to share and debate and learn together. Lots of really smart people sharing their passions and encouraging others to get involved.
I fell in love with the Ultimaker S5 right away, and I quickly fell out of love when I saw the price tag. But stepping down a level brought me to the Ultimaker S3. Make no mistake: this is not a cheap printer. It's probably a few steps above what I needed as an entry level device, but it checked all my boxes.
After my first week of using it, I only have two issues, which are minor.
1) A handful of UI options are unclear. I spent an hour trying to figure out how to reload my filament after the setup process failed. Settings and Maintenance seemed like the place to look, but no. Once I figured out where to look, it's as easy as one might hope, but a few clearer UI signals would help.
2) This one has more to do with expectations than the printer itself. The printer has a built-in camera. You can monitor your print job online or via mobile app at any time. It's a great feature. The camera uploads a photo every second to AWS or Google Cloud or some such storage space. I expected, for some reason, to be able to view the output of these images as a timelapse video. Alas, no such functionality exists. People have written Python scripts to achieve the same results, but it's a no-brainer for Ultimaker to implement the feature. Either create the timelapse and let me download it, or give me a bulk zip file of all the stored photos. (I imagine this might quickly eat up their cloud storage or bandwidth, but I'd pay extra for the ability).
As it stands now, I'll need to make my own timelapses. Don't get me wrong: the camera feature is super valuable, even without the timelapse functionality. The ability to check the status of the print is both reassuring and a time saver when something goes wrong.
Try, Try, Try (Again)
Once the printer arrives, you're faced with the next big decision. What to print?!
I stumbled around the internet until I found a site called Thingiverse, where people upload designs for all to share. I settled quickly on this Baby Yoda model, because Star Wars. It also signifies my personal status as a newborn in this 3D Printing world. Bonus: it looked amazing. And yes, I know Baby Yoda isn't actually named Baby Yoda, but life is easier for non Star Wars fans if we pretend otherwise.
Once you select a model, you need a slicer application. A slicer application takes your 3D model, analyzes it, and creates the "slices" or layers of instruction to send to the printer. Thankfully, Ultimaker has their own well-regarded slicer application called Cura. It easily imported the Baby Yoda model, sliced it accordingly, and sent the instructions via internet to the wi-fi connected printer.
It all seemed too easy. Then things got fun.
The first print started, but no filament extruded. The printer went through the paces laying down nothing on the glass bed. After ten minutes of wondering whether this was normal, I decided it was not and aborted the print job.
The second print started, but no filament extruded. I aborted.
Third try is the charm, right? Wrong. Aborted.
At this point I had no idea what was happening. I ran a maintenance process to clean the extruder head, and during that process the filament extruded as expected.
Fourth print started, but no filament extruded. I aborted.
I reinstalled both filament spools.
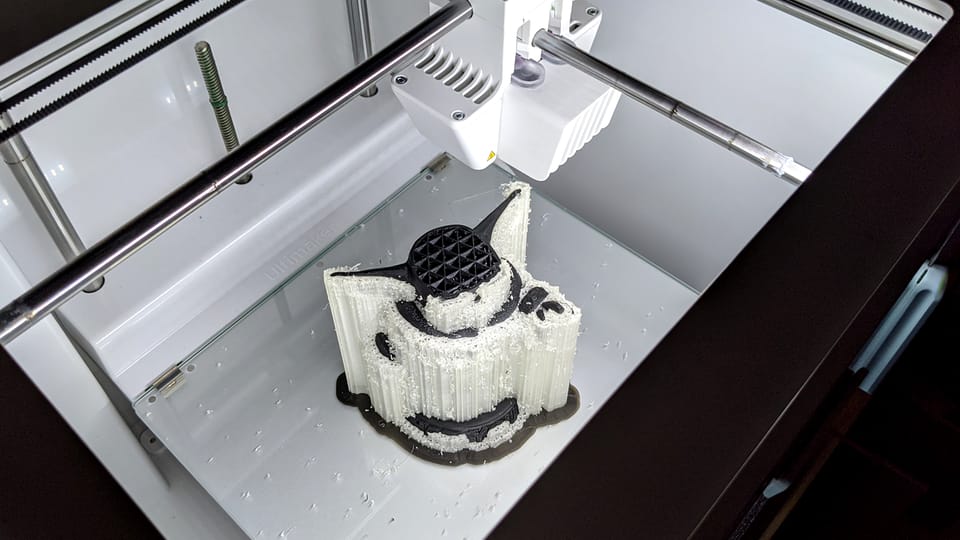
Fifth print started... FILAMENT! I DID IT! This euphoria lasted about twenty minutes, at which time the print dislodged from the glass bed. Everything fell apart quickly.
As suggested everywhere, I added glue to the bed to improve adhesion.
Sixth print started. Filament still working! Twenty minutes later, the print again dislodged from the bed.
By now it was 2am. I decided to wait until the next morning to try again.
I had a few conversations with my teenage nephew who has been 3D printing for a year. He recommended two things. One I had considered. The other I had not.
First, print with supports. The printer will lay down PVA support filament alongside the PLA Filament. Think of it like the scaffolding erected around buildings and monuments during construction. This scaffolding will provide more connection points with the glass bed, reducing the likelihood of the print dislodging. You can dissolve the support structures in water when finished.
Second, rotate the print. The Baby Yoda model was situated with Baby Yoda's back along the X plane. Easiest way to envision this is to picture Baby Yoda lying down on a table. Due to the design of the model, however, Baby Yoda's back wasn't in contact with the plate. This meant there would be only two small connection points to the glass bed: one at the back of Baby Yoda's right ear, the other at the base of the bottom pedestal. Even when the printer put down a skirt (i.e. excess printed material to improve base plate adhesion and prepare the extruder), the point of contact at the ear was the primary point of failure.
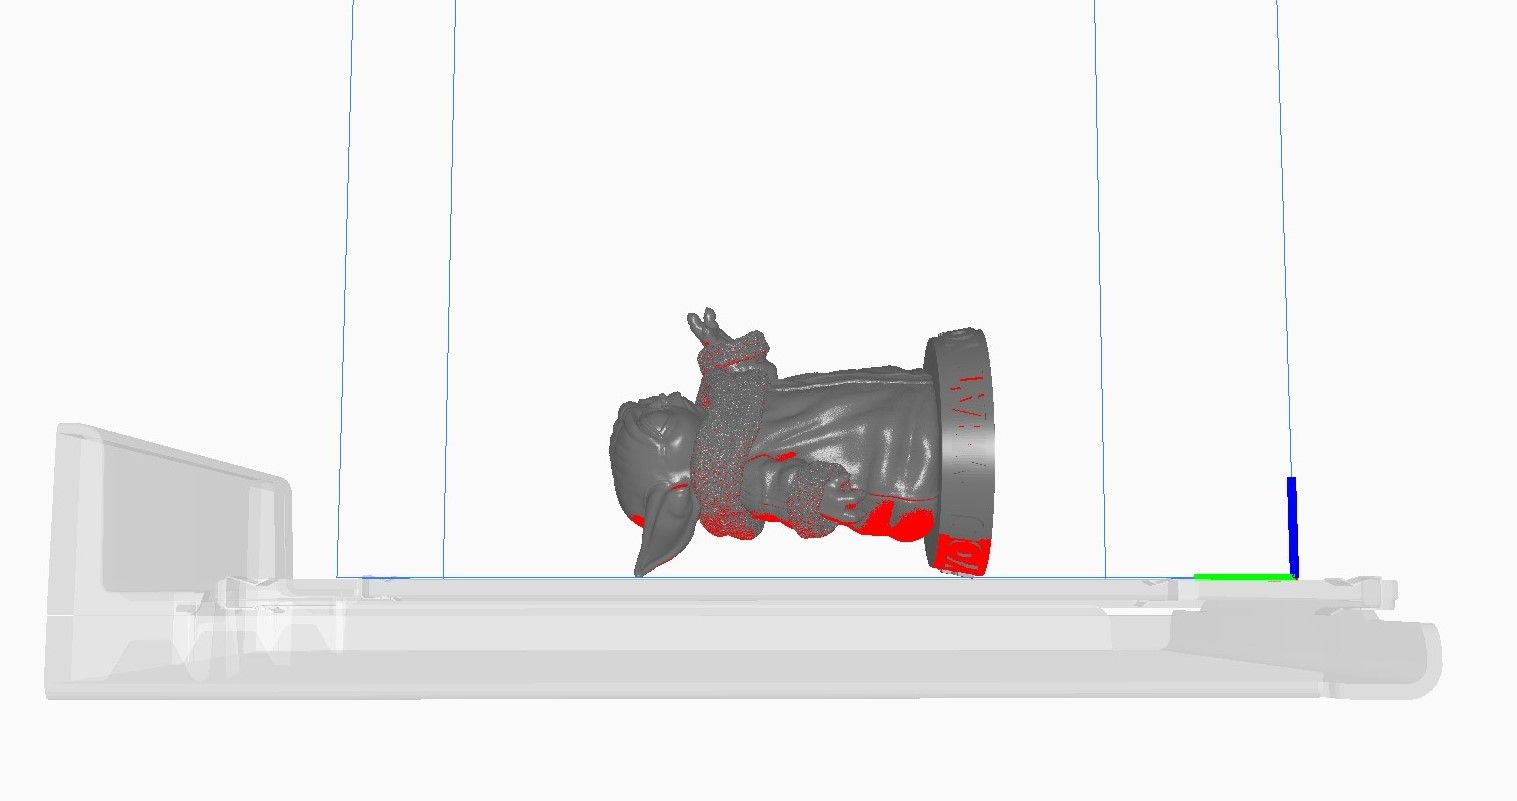
I assume the horizontal orientation of the model is the preferred method of printing because of vertical layering. Fewer vertical layers should print faster than more. In other words, a shorter object will print faster than a taller one (in general, with obvious caveats for the amount of data on each layer. I'm definitely speculating here.) By laying Yoda on his back, you have fewer vertical layers but also fewer touch points.
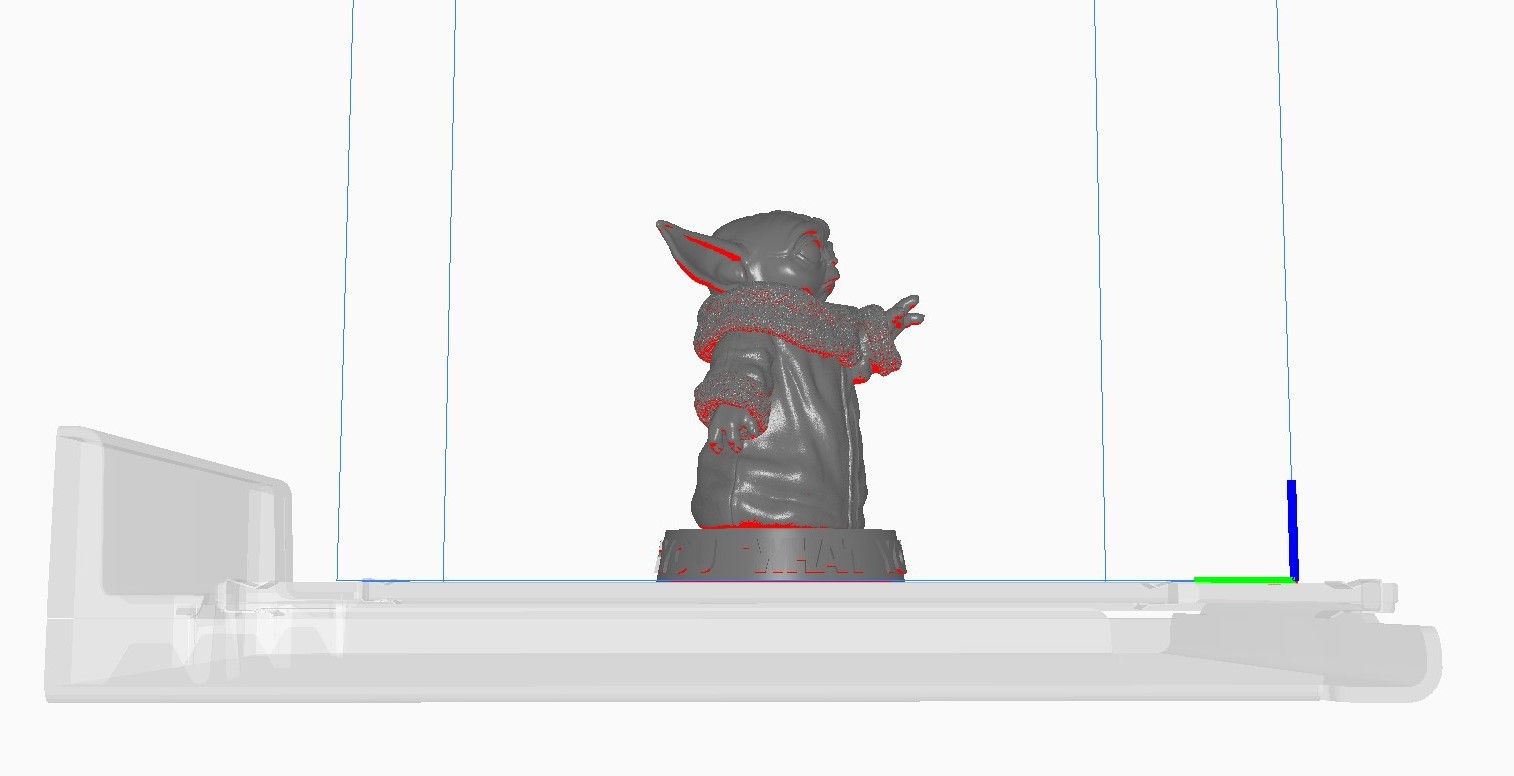
I rotated the model to a vertical position, with the wide pedestal contacting the X plane. Ultimately, this worked, but I can't confidently say both steps were necessary. I suspect the supports alone would have increased the points of contact with the bed and prevented the print from dislodging even if I hadn't rotated it.
Regardless, my next print started... No filament extruded. Dammit. Abort.
I tried again. This time, I found a setting on the printer to improve the flow of extruding filament. I increased from 100% to 103%. When everything suddenly began working as expected, I tested the flow and settled on 101%.
Thirty-six hours later, I had my very own Baby Yoda. Whew.
"Be patient. Treat it like a hobby."
Post Printing
The next task is to remove the model from the bed plate. Easier said than done. My plate is glass, and, as mentioned above, I applied glue for better adhesion. The result was a print firmly attached to the plate.
I allowed it to cool overnight. I read that this would cause natural separation between the bed and the print due to material contraction. It wasn't enough.
As you can see in the video, I tried running cold water over the glass to force the material to contract further. I dug at the edges of the print with knives and spatulas. I sprayed at the edges with a water/alcohol solution. All to little effect.
Finally, I placed the glass bed on an ice pack. This caused rapid cooling. I heard cracking. Coupled with more water/alcohol solution and continued pressure with a spatula, the print popped off flawlessly. I jumped. I thought I broke either the print or the glass.
In all, I spent about 30 minutes removing the print from the plate. Not a long time, but it felt longer given the uncertainty and fear of destroying 36 hours of work.
At this point, Baby Yoda didn't look like Baby Yoda. He/She/They/It wore a thick sweater of PVA support structures. According to websites and youtube videos (and my nephew!), the fix involved soaking the print in water overnight.
Overnight lasted about 30 hours, and those hours were not uneventful. Hoping to accelerate the process, I followed more instructions found online. I agitated the water regularly. A few times, I emptied the bucket and added warmer water. After about five hours, I thought, "We're almost done!" But the closer you get to the model, the more stubbornly the PVA clings to it.
By the end, I found myself scrubbing hard-to-reach areas (like under yoda's chin) with a toothbrush and running water. This had minimal effect. I suspect a bit of sandpaper or dental floss might do the job, but the last bits are not really noticeable, so I ultimately gave up.
I have ideas on how I might improve this part of the process. I was surprised the model floated in water, which made it difficult to keep all the PVA submerged. I think a wire mesh of some sort, with weights at the bottom, would help in the future. I also wonder if an aquarium filter or vibrating mechanism would keep the water agitated. It's difficult to say how much or what type of agitation is needed, because I didn't notice that stirring the water produced any significant effects. That being said, because of the slow nature of the process, it's difficult to quantify the effects of any procedural changes without methodical study. If the manufacturers of the material say agitation helps, I'll believe them.
Lessons Learned
This was quite the week of learning. In truth, it was much longer than a week, because I spent at least a month researching. Thankfully, my learning is now grounded with a bit of experience.
So what I have learned? 3D Printing is as impressive a technology as they say, and I've only scratched the surface. A Baby Yoda model isn't a practical example, but the idea of printing parts and tools and prototypes is not farfetched. In fact, plenty of people already do it. Instead of waiting a week to get some $2 part off Amazon, you could print it yourself in an afternoon. I'm already talking to my buddy about printing props for a fantasy TV series he's planning. And I haven't even scratched the surface of large scale initiatives like printing buildings and homes with concrete.
I don't know that consumer/prosumer machines can serve in a viable mass production process. Obviously, you can't make much money selling Baby Yoda figures that take 36 hours to print when a mass produced version of the exact same model would retail for under five dollars and be of equal or higher quality. Someone will surely figure out a low inventory mass production model (if they haven't already), but mass production isn't my use case.
And what about the environment?! Obviously, printing plastic doesn't rank highly in my list of sustainability goals. Thankfully, the PLA I'm using is biodegradable. "Polylactide (PLA), is a renewable thermoplastic and a polymer. It is 'processed' from the starch of plants such as corn, sugar cane and sugar beet, making it environmentally friendly and sustainable. Fermentation of the sugars from these plants produces lactic acid and after further reactions, lactide forms." The catch, however, is that to properly compost it, you need an industrial composting facility than can heat the PLA to 140 degrees and introduce microbes to break up the starches. (Sources: here and here) This will be a subject I keep my eye on going forward to see if I can discover the best solution. I imagine I can personally send my own waste to a facility, but I can't do that for any models I give away or sell. Will report back when I learn more.
Next Steps
For me, the next step is design. I now understand some basics of printing, but I don't want to print other people's designs forever.
My experience with AutoCAD is 20 years in the past. In another life, I loved drafting and CAD, and I started college as an Architecture major. I'm not sure how well any of those software skills translate to now, but at least I understand the concepts and can read a (basic) technical drawing.
I'm in the early days of experimenting with AutoDesk Fusion 360. It already makes a few complicated tasks incredibly simple, but it also complicates tasks I expect to be easy. This is true for most software, and I'm sure my proficiency will increase with use.
I'm no sculptor. I don't know that I'd benefit from digital sculpting tools like ZBrush or other tools my artistic friends use in the 3D animation world. My initial application should be doable in Fusion 360, even with my rudimentary skills. Regardless, it's something I enjoy, so the learning process shouldn't be too painful.
If all goes well, one day soon I'll be telling you about my own 3D printed designs. This journey, like so many others, has only just begun.